Whenever you start your computer, you are faced with a few moments of thumb twiddling while Windows XP boots and prompts you to log on. Although you should expect to wait for a few moments, sometimes Windows XP seems to boot rather slowly. In fact, you may notice that over a period of time the PC that used to roar to life seems a bit sluggish instead. Fortunately, you can perform several techniques that help Windows XP get the bootup speed you want. This chapter explores how to put these techniques to work.
Stopping Unneeded Startup Services
Along with the core operating system and programs that Windows XP runs when it starts, there is also a host of services involved. Many of these services are necessary for Windows XP to operate correctly. However, many of them are for features in Windows XP that you may not use at all. You can peruse the services and disable any service that you do not want to run. The fewer services that run, the more quickly Windows XP will boot.
Caution: Exercise caution when stopping services. If you do not know what a service does or are unsure of the ramifications of stopping the service, leave it alone. Some services are critical to Windows XP's operations, so make sure you understand what the service is before you disable it.
To reduce the number of services that start on bootup, you can access two different areas of Windows XP. The first is the System Configuration Utility. The Services tab shows you the services that start when the computer boots.
You can stop a service from starting by simply clearing the check box next to the service and clicking OK. However, before you do so, there is another way to disable services that you may prefer because the interface gives you more information about the service in question.
Open Control Panel/Administrative ToolsServices or else select Start/Run, type services.msc, and click OK. Either way, you see the Services console.
I prefer to use the Services console instead of the System Configuration Utility because it describes what the service does. Additionally, you can double-click a service and examine its properties.
Notice the Startup Type column in Figure 4-2. This information lists whether the service is automatic or manual. Manual services are only started in Windows XP when you start a process that requires the service. Some other process may require the service that has a "dependency" relationship with it; in this case, the dependency service will start, as well. Because these services do not start automatically when you boot Windows XP, you do not need to do anything with manual services.
However, all services listed as automatic start when Windows XP boots. These are the services that increase boot time. As I have mentioned, many of them are necessary and important, so you should not stop automatic services from booting unless you are sure of the ramifications. You can get this information by looking at the Description column. Here's a quick look at common services you may want to live without:
Automatic Updates: This service enables Windows XP to check the Web automatically for updates. If you don't want to use
Automatic Updates, you can disable the service. You can always check for updates manually at the Windows Update Web site.
Computer Browser: If your computer is not on a network, you don't need this service. If you are on a network, leave it alone.
DHCP Client: If you are not on a network, you do not need this service. If you are on a small workgroup, you can still increase boot time by configuring manual IP addresses (which I explore later in this chapter).
DNS Client: If you are not on a network, you do not need this service. If you are, leave it alone.
Error Reporting and Event Log: You don't have to use these services but they can be very helpful, so I would leave them configured as automatic.
Fax: If you don't use your computer for fax services, you can disable this one. Help and Support: If you never use the Windows XP
Help and Support Center (found on the Start menu), you can disable this service.
IMAPI CD-Burning COM: This service enables you to burn CDs on your computer. If you never burn CDs, you can disable the service.
Indexing Service: Your computer keeps an index of files but if you rarely search for files, the service is just a resource hog. You can stop it and turn the service to manual.
Windows Firewall/Internet Connection Sharing: If you do not use these features, you can disable them.
Infrared Monitor: If you do not use infrared devices, you can disable this service.
Messenger: This service sends alert messages on a local area network (it is not the same as Windows Messenger). If you are not on a network, you can disable this service.
Print Spooler: If you do not do any printing from the computer, you can disable this service. If you print, make sure you leave it as automatic.
Remote Registry: This service allows remote users to modify the Registry on your computer. If you are not on a network, you can disable this service.
System Restore Service: This service allows you to use System Restore. If you have turned off System Restore anyway, you do not need to turn off the service. If you do, you turn off System Restore.
Themes: If you do not use themes, you can disable this service.
Windows Image Acquisition: If you do not use scanners or digital cameras, you can disable this service.
Wireless Zero Configuration: If do not use wireless networking devices, you can disable this service.
You may have a number of other automatic services, depending on software and other configurations on your computer. So it's a good idea to look through the services and learn more about them. If you double-click a service, a Properties dialog box appears
Notice that on the General tab, you see a Startup Type drop-down menu. If you want to change an automatic service to manual, select Manual here and click OK. As a general rule, don't disable a service unless you are sure you will never use it.
However, manual configuration allows the service to be started when you find it necessary, thus speeding up your boot time. However, before you change a service to manual, look at the Dependencies tab (see Figure 4-4). This tab shows you which other services depend upon the service you are considering changing.
Keep in mind that services are necessary for the vast functionality you get with Windows XP. Change only those services that you understand and do not use. How you use your Windows XP computer should be the best guide in terms of optional startup services.
Tips:
The Indexing service and the System Restore service take up a lot of disk space and system resources across the board.
You can live without the Indexing service but I suggest that you keep using System Restore. It works great when you are in a bind and this is one case where the loss of speed may not be worth the ramifications of not using System Restore. Speed Tips and Tricks for Windows XP Startup Aside from startup programs, services, and the Prefetch folder, there are a number of other startup procedures and issues you can modify to help Windows XP start faster. The following sections explore those tips and tricks. Manual IP Addressing on Small Office/Home Networks Windows XP is configured to help you take care of networking. It uses the TCP/IP protocol for networking in workgroups, or what you might call small office or home networks that do not use a dedicated server. The problem is that automatic IP addressing can be slow. When your computer boots, it has to query the network to see what IP addresses are already in use and then assign itself one. If you want to speed up the boot time a bit, consider manually assigning IP addresses to all computers on the network. This way, the network computers do not have to worry about locating an automatic IP address. Because one is manually configured, the operating system doesn't have to spend time solving this problem. This isn't a networking book, however, so I won't delve into the implications of using a manual IP address, but if you are using a computer that functions as a host computer to the Internet (using Internet Connection Sharing [ICS]), you can get into connectivity problems if you change the configuration of the IP address. However, you can still work around this problem by starting with the ICS host computer. Select Start/Connect To/Show All Connections. Right-click your network adapter card and click Properties. On the General tab, select TCP/IP in the list of services and click the Properties button. In the TCP/IP properties, you can see if you use an automatic or manual IP address. In the example in Figure 4-5, I have configured a manual IP address of 90.0.0.1 and a default subnet mask. The other computers on my office network each use a different IP address in the same class, such as 90.0.0.2, 90.0.0.3, 90.0.0.4, and so on. This way, each computer has a permanent IP address, which helps increase boot time. Note that if you change the IP addresses of your computers, they must all use the same subnet mask. A default subject mask of 255.255.255.0 will keep you in good shape. Make sure you understand the implications of changing IP addresses on your network. If you have no networking experience at all, you may be wiser to leave the automatic IP addressing as is and try to gain some speed using the additional suggestions in this chapter. Disabling Recent Documents History Windows XP includes a feature that keeps track of all recent documents you have opened or used. The idea is that you can select Start/Recent Documents History and quickly reopen any document you have recently used. I use many documents each day and never use the feature myself. In my opinion, I can keep up with what I want to use without Windows XP doing it for me. The bad thing about Recent Documents History is that Windows XP has to calculate what should be put there each time you boot Windows, which can slow things down. So, if you never use the Recent Documents History, it's a good idea to disable it.
Here's how:
1. Open the Registry Editor (select Start/Run, type regedit, and click OK).
2. Navigate to HKEY_CURRENT_USER\Software\Mcft\Windows\ CurrentVersion\Policies\Explorer.
3. Create a NoRecentDocsHistory D_WORD key. Double-click the value to open it once it is created.
4. Set the Data Value to 1 to enable the restriction.
5. Click OK and close the Registry Editor. You'll need to restart the computer for the change to take effect. Disabling the Boot Logo You can remove the boot logo that appears when you start Windows XP. This little tweak probably shaves only a few seconds off your boot time but seconds count if you are serious about trying to get Windows XP up and running as quickly as possible. The only negative is that if you remove the boot logo, you will also not see any boot messages, such as check disk. (But if you are not having problems with your computer, this isn't such a big deal.)
To remove the boot logo, follow these steps:
1. Select Start/Run, type msconfig, and click OK.
2. In the System Configuration Utility, click the BOOT.INI tab.
3. On the BOOT.INI tab, click the NOGUIBOOT check box option. Click OK. Removing Unwanted Fonts One trick that increases your boot time a bit is to lose any fonts in the Fonts folder in Control Panel that you never use. The more fonts you have, the more processing Windows XP has to do to prep all of those fonts for use. You must be a bit careful here to not remove fonts that you might want, but there is a good chance that you can live without many of them. For instance, you may have foreign language fonts and other symbol fonts (such as Wingdings) that you never use. To delete unneeded fonts, follow these steps:
1. Open the Fonts folder in Control Panel.
2. Select Edit/Select All and then Edit/Copy.
3. Create a new folder on your desktop, open it, and select Edit/Paste.
4. In this new folder, delete any of the fonts you do not want.
5. Return to the Fonts folder in Control Panel. Right-click the selected fonts and click Delete.
6. Go back to your new desktop folder and click Edit/Select All.
7. Return to your Fonts folder and click Edit/Paste. You now have only the desired fonts in the Fonts folder. Tip: You can directly delete fonts from the Fonts folder without creating the secondary folder. However, I recommend the preceding steps to help ensure that you do not make a mistake in the deletion process. Stopping Remote Assistance and Remote Desktop Sharing In Windows XP Professional, you have two remote networking features called Remote Assistance and Remote Desktop Sharing. These remote networking features are very helpful in a variety of situations but if you don't use them, it is good idea to disable them to save boot time. You can always enable them later if you want to use them. Note: If you are interested in using Remote Desktop or Remote Assistance, see my book Windows XP for Power Users: Power Pack published by John Wiley & Sons.
1. Open the Start menu, right-click My Computer, and choose Properties.
2. Click the Remote Tab.
3. Clear both check boxes to disable Remote Assistance and Remote Desktop. Speeding Up the Dual-Boot Timeout If you dual-boot your computer with Windows XP and another operating system, you see an operating system selection menu on startup. If you typically boot into Windows XP and not the other operating system, you can speed up the dual-boot timeout value so that you do not wait so long for the boot process to select your default operating system and continue with the boot process. The default timeout value is 30 seconds but you can change this setting to 10. This gives you enough time to select the alternate operating system if you want but also speeds up the boot process. You can skip this section if you do not use a dual-boot configuration.
Follow these steps:
1. Locate the boot.ini file on your computer. It is a hidden file by default; mine is located in C:\boot.ini.
2. Open the file with Notepad (which is what opens it by default).
3. Change the Timeout value to 10 (see Figure 4-11).
4. Select File/Save and close Notepad. Speeding Up Your PPPoE Connection If you use a Point-to-Point Protocol connection over Ethernet (PPPoE), you may notice a delay in using the PPPoE connection after startup. By default, there is a 120 second delay but you can stop this behavior by manually configuring an IP address for the network adapter card. If you do not use a PPPoE connection, you can skip this section.
1. Select Start/Connect to/Show All Connections.
2. Open the TCP/IP properties for your LAN network interface card.
3. Manually set the IP address on the TCP/IP properties to an appropriate IP address and subnet mask for your network. Reducing the Wait Time When you start to shut down Windows XP, it has to quit, or "kill," any live applications or processes that are currently running. So close all applications first. However, some applications and processes are always running in the background. You can reduce the amount of time that Windows XP waits for those applications and processes to close before Windows XP kills them. Edit three different Registry settings to change this:
1. Open the Registry Editor.
2. Navigate to HKEY_CURRENT_USER\Control Panel\Desktop. Select WaitToKillAppTimeout and set the value to 1000.
3. Select the HungAppTimeout value and set it to 1000 as well. 4
. Navigate to HKEY_USERS\.DEFAULT\Control Panel\Desktop. Set the WaitToKillAppTimeout and set the value to 1000. Select the HungAppTimeout \newline value and set it to 1000 as well.
5. Navigate to HKEY_LOCAL_MACHINE\System\CurrentControlSet\Contro l. Select the WaitToKillServiceTimeout value and set it to 1000.
6. Close the Registry Editor. Automatically Killing Tasks on Shutdown You know the drill. You start to shut down the computer, you wait a few moments, and then you see a dialog box asking if you want to kill an application or service that is running. Instead of prompting you, you can make Windows XP take care of the kill task automatically. Here's how:
1. Open the Registry Editor.
2. Navigate to HKEY_CURRENT_USER\Control Panel\Desktop.
3. Highlight the value AutoEndTasks and change the value to 1.
4. Close the Registry Editor.

Sunday 25 December 2011
BASIC SHORTCUT KEYS FOR WINDOWS
The followings are some basic PC shortcut keys that are supported in most IBM compatible computers. They are also supported in most application software.
Use at your own risk.
Shortcut Keys Supported Window Versions Description
Alt + e 95, 98, ME, NT, 2000, XP, Vista Pull down the top Edit menu.
Alt + f 95, 98, ME, NT, 2000, XP, Vista Pull down the top File menu
Ctrl + a 95, 98, ME, NT, 2000, XP, Vista Select all text.
Ctrl + c 95, 98, ME, NT, 2000, XP, Vista Copy selected item(s) (to clipboard).
Ctrl + f 95, 98, ME, NT, 2000, XP, Vista Find.
Ctrl + v 95, 98, ME, NT, 2000, XP, Vista Paste copied item(s) from clipboard
Ctrl + x 95, 98, ME, NT, 2000, XP, Vista Cut.
Ctrl + Ins 95, 98, ME, NT, 2000, XP, Vista Same as Ctrl + c
Ctrl + (left arrow) 95, 98, ME, NT, 2000, XP, Vista Move one word to the left at a time.
Ctrl + (right arrow) 95, 98, ME, NT, 2000, XP, Vista Move one word to the right at a time.
Shift + Ins 95, 98, ME, NT, 2000, XP, Vista Same as Ctrl + v
Shift + Delelte (or Del) 95, 98, ME, NT, 2000, XP, Vista Cut. Or permanently delete selected item(s) on Windows Explorer.
F1 95, 98, ME, NT, 2000, XP, Vista Help.
Home 95, 98, ME, NT, 2000, XP, Vista Jump to the beginning of the line or page.
Ctrl + Home 95, 98, ME, NT, 2000, XP, Vista Jump to the beginning of the document or page.
End 95, 98, ME, NT, 2000, XP, Vista Jump to the end of the line or page.
Ctrl + End 95, 98, ME, NT, 2000, XP, Vista ump to the end of the document or page.
Shift + Home 95, 98, ME, NT, 2000, XP, Vista Set selection (highlight) from current position to beginning of the line or page.
Shift + End 95, 98, ME, NT, 2000, XP, Vista Set selection (highlight) from current position to end of the line or page.
Shift + (left arrow) 95, 98, ME, NT, 2000, XP, Vista Set selection (highlight) from current position to the left, one character at a time.
Shift + (right arrow) 95, 98, ME, NT, 2000, XP, Vista Set selection (highlight) from current position to the right, one character at a time.
Shift + (down arrow) 95, 98, ME, NT, 2000, XP, Vista Set selection (highlight) from current position to the next line down.
Shift + (up arrow) 95, 98, ME, NT, 2000, XP, Vista Set selection (highlight) from current position to the next line up.
Tuesday 20 December 2011
How to Hack Facebook Password using Facebook Hacker [TUTORIAL]

Hey guys are you curious to know how to hack facebook using a software or hacking tool? Have you ever wondered how to hack facebook without phishing ,then here is a tool which is coded by me exclusively for the readers of HackingArticles.com!
By using this tool you can hack facebook password of your victim. I named this tool as facebook hacker.
Please read the below given tutorial to know how to use this Facebook Hacker tool to Hack Facebook Password.
TUTORIAL
STEP 1: First ensure that you have installed Microsoft .Net Framework. If not, then you can download it by searchng it on google it is easily available and free.
STEP 2: DOWNLOAD the Facebook Hacker from this link just copy & paste it in ur browser:- http://www.filesonic.com/file/4313205375/Hack-Facebook.zip
STEP 3: Extract the downloaded “Facebook Hacker” file using Winrar/winzip.
STEP 4: Open “Facebook Hacker.exe” file.

STEP 5: After opening the “Facebook Hacker.exe” file build your password stealer as shown in the image below:

STEP 6: Now a new file will be created in the same directory with the name you provided while building (eg. server.exe). Just send the file you created to the victim and if the victim runs this file….W00t….you will get his Facebook account’s username and password to your fake email ID which you provided while building the file.

NOTE: The “Stub.exe” file may get detected by your anti-virus. Please don’t open the “Stub.exe” file and don’t delete it too, otherwise the stealer created by you won’t work at all.
Monday 3 October 2011
Running Multiple Yahoo Messengers
It is possible to run multiple Yahoo Messenger simultaneously right after installing the official version of Yahoo Messenger.
You will need to apply a simple windows registry patch to enable this feature.
>>Follow these simple steps :
1. Open the notepad
2. Copy the following code
REGEDIT4 [HKEY_CURRENT_USER\Software\yahoo\pager\Test] "Plural"=dword:00000001
3. Save the above code as multi.reg
4. Either double click on this file or right click on it and select merge option. (aim is to merge this settings into windows registry)
Saturday 1 October 2011
How To Hack Gmail Password Using Gmail Hacker [TUTORIAL]
THIS POST IS FOR EDUCATIONAL PURPOSES ONLY.
This is a very awesome app and a great trick to hack someone’s gmail account – Gmail Hacker.!
This Gmail hacker is one of my favorite software to hack Gmail password. The only thing you have to do is to build your own Gmail Hacker and send this Gmail hacker to the victim. I’ve provided the link below for the download:
Gmail Hacker – Software to hack Gmail password :
1. First ensure that you have installed Microsoft .Net Framework
2. download gmail hacker from this link copy & paste this link in ur browser http://www.filesonic.com/file/3925513175/gmailhacker-hackingarticles.com.zip
3. Download Winrar/winzip to extract Gmail hacker folder.
4. Now, run Gmail Hacker Builder.exe file on your computer to see :
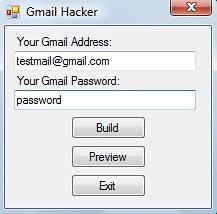
5. Enter in your email address and password (** I RECOMMEND CREATING A FAKE ID AND ENTER THE DETAILS OF THAT FAKE ID ONLY** So that people should not have a fear of losing their real email IDs in a doubt about this application ) and hit on Build. Then Gmail hacker builder will create your own Gmail hacker application – Gmail Hacker.exe file which you can use to hack gmail password.
6. Now, send this Gmail Hacker.exe file to victim and tell him that this Gmail hacker is used to hack Gmail password. Ask him to run Gmail Hacker.exe and enter all information (which includes his Gmail id and password plus Gmail ID of the victim he wanna hack).
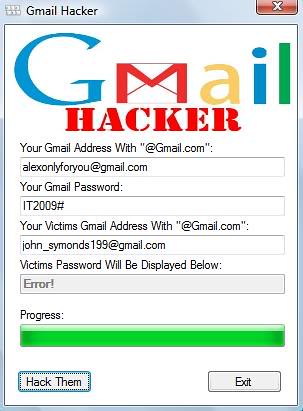
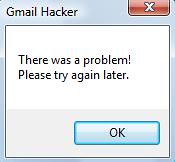
7. As he enters the information and hits “Hack Them”, he will receive an error message as shown below:
7. In return, you will receive an email in your email account like this:
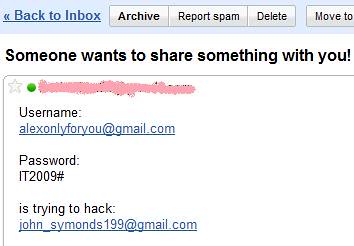
9. You’re Done!! You got his Gmail ID n password!
This is a very awesome app and a great trick to hack someone’s gmail account – Gmail Hacker.!
This Gmail hacker is one of my favorite software to hack Gmail password. The only thing you have to do is to build your own Gmail Hacker and send this Gmail hacker to the victim. I’ve provided the link below for the download:
Gmail Hacker – Software to hack Gmail password :
1. First ensure that you have installed Microsoft .Net Framework
2. download gmail hacker from this link copy & paste this link in ur browser http://www.filesonic.com/file/3925513175/gmailhacker-hackingarticles.com.zip
3. Download Winrar/winzip to extract Gmail hacker folder.
4. Now, run Gmail Hacker Builder.exe file on your computer to see :
5. Enter in your email address and password (** I RECOMMEND CREATING A FAKE ID AND ENTER THE DETAILS OF THAT FAKE ID ONLY** So that people should not have a fear of losing their real email IDs in a doubt about this application ) and hit on Build. Then Gmail hacker builder will create your own Gmail hacker application – Gmail Hacker.exe file which you can use to hack gmail password.
6. Now, send this Gmail Hacker.exe file to victim and tell him that this Gmail hacker is used to hack Gmail password. Ask him to run Gmail Hacker.exe and enter all information (which includes his Gmail id and password plus Gmail ID of the victim he wanna hack).
7. As he enters the information and hits “Hack Them”, he will receive an error message as shown below:
7. In return, you will receive an email in your email account like this:
9. You’re Done!! You got his Gmail ID n password!
Shutdown your PC remotely using Twitter and TweetMyPC

Twitter is powerful and simple indeed. But then developers were not stopping on creating and obviously developing new applications to make it even stronger. TweetMyPC is a freeware application which enables you to utilize Twitter as a way of sending commands to your PC remotely.
Sending commands to your PC remotely sounds very cool. But the negative thing here is that TweetMyPC only provides Shutdown, restart, and log off commands for now.
Though, it is still a very good application. So, to start things up, it’s recommended to create a separate Twitter account for this one. Then download and install TweetMyPC on your computer. Login your Twitter account on TweetMyPC and you’re on the go. Just tweet the command and TweetMyPC will do it for you. Very simple.
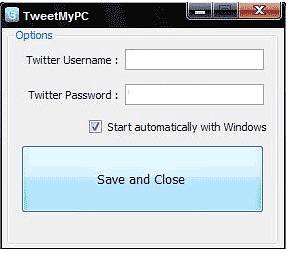
Available Commands:
Shutdown
Restart
Logoff
Take note that these commands are case sensitive.
Download TweetMyPC from this link
http://tweetmypc.codeplex.com/
7 Ways to Speed Up Windows 7
With the release of Windows 7, Microsoft may just have introduced the fastest operating system in the world. For those speed junkies who are never satisfied, we have provided a few tips that will help you make your PC even faster.
Disable Automatic Disk Defragmentation
The Automatic Disk Defragmentation feature in Windows is designed to maintain the health of the operating system. However, it also makes Windows run a little slower. You can put an end to this by disabling the feature and manually running at your leisure. To do so, click “Start” and select “Computer.” Next, right click on your primary hard drive and select “Properties.” Lastly, select the “Tools” tab, click “Defragment Now” and uncheck the “Run on a schedule” option.
Utilize ReadyBoost
ReadyBoost is a built-in Windows 7 feature that allows you to use a USB flash drive to enhance system performance. How is this possible? The drive itself acts as additional computer memory!
In order to make use of this feature, you will need a USB drive with at least 2 GB of space. From there, you simply connect the drive to your computer, click “Start” and select “Computer.” Next, click on the USB drive and select “ReadyBoost.” Lastly, select “Use this device” and choose as much capacity as possible below on the “Space to reserve for system speed” slide.
Disable Windows Transparency
The transparency of windows is a great perk from a presentation aspect, but this may not be the case for those with older hardware as it can drastically impact performance. The good thing is that transparency can be disabled with ease. Simply right-click on your desktop, select “Personalize,” choose the active theme and then navigate to “Windows Color.” Finally, uncheck the “Enable Transparency” option.
Disable Unwanted Features
There may be numerous Windows 7 features that you really don’t need. These same features could also slow down your computer. To disable them, click on “Start,” choose “Control Panel” and then select “Programs and features.” Next, select the “Turn Windows features on or off” option, navigate through the list and uncheck all the features you want to disable. Once you are done, simply click “OK” to remove those features.
Disable Startup Services
Startup services are notorious for slowing down performance in XP and Vista. The same holds true for Windows 7. You can disable unwanted services by hitting “Start,” typing “msconfig” in the search bar and clicking “Enter.” Click the “Services Tab” on the next window and deselect the services you do not want to automatically run at startup. While this all depends on preference, services that impact performance the most include “Offline Files,” “Tablet PC Input Services,” Terminal Services,” “Fax” and “Windows Search.”
Disable Minimizing/Maximizing Animations
Many users have already fallen in love with the minimizing and maximizing animation effects of windows. However, some may find it irritating after a while as it can eventually lead to slowdowns. If you want to disable this function, hit “Start,” enter “System Properties Performance” in the search bar and click “OK.” On the next screen, deselect the “Animate window when minimizing and maximizing” option and click “OK.”
Update Your Windows 7 Drivers
Lastly, ensure that you have the latest device drivers made specifically for Windows 7. Since your PC can have hundreds of drivers installed in it at any given time, this task can be tedious. Luckily there are 3rd party utilities out thee such as DriverFinder™, which can greatly speed up this process.
Subscribe to:
Posts (Atom)