Whenever you start your computer, you are faced with a few moments of thumb twiddling while Windows XP boots and prompts you to log on. Although you should expect to wait for a few moments, sometimes Windows XP seems to boot rather slowly. In fact, you may notice that over a period of time the PC that used to roar to life seems a bit sluggish instead. Fortunately, you can perform several techniques that help Windows XP get the bootup speed you want. This chapter explores how to put these techniques to work.
Stopping Unneeded Startup Services
Along with the core operating system and programs that Windows XP runs when it starts, there is also a host of services involved. Many of these services are necessary for Windows XP to operate correctly. However, many of them are for features in Windows XP that you may not use at all. You can peruse the services and disable any service that you do not want to run. The fewer services that run, the more quickly Windows XP will boot.
Caution: Exercise caution when stopping services. If you do not know what a service does or are unsure of the ramifications of stopping the service, leave it alone. Some services are critical to Windows XP's operations, so make sure you understand what the service is before you disable it.
To reduce the number of services that start on bootup, you can access two different areas of Windows XP. The first is the System Configuration Utility. The Services tab shows you the services that start when the computer boots.
You can stop a service from starting by simply clearing the check box next to the service and clicking OK. However, before you do so, there is another way to disable services that you may prefer because the interface gives you more information about the service in question.
Open Control Panel/Administrative ToolsServices or else select Start/Run, type services.msc, and click OK. Either way, you see the Services console.
I prefer to use the Services console instead of the System Configuration Utility because it describes what the service does. Additionally, you can double-click a service and examine its properties.
Notice the Startup Type column in Figure 4-2. This information lists whether the service is automatic or manual. Manual services are only started in Windows XP when you start a process that requires the service. Some other process may require the service that has a "dependency" relationship with it; in this case, the dependency service will start, as well. Because these services do not start automatically when you boot Windows XP, you do not need to do anything with manual services.
However, all services listed as automatic start when Windows XP boots. These are the services that increase boot time. As I have mentioned, many of them are necessary and important, so you should not stop automatic services from booting unless you are sure of the ramifications. You can get this information by looking at the Description column. Here's a quick look at common services you may want to live without:
Automatic Updates: This service enables Windows XP to check the Web automatically for updates. If you don't want to use
Automatic Updates, you can disable the service. You can always check for updates manually at the Windows Update Web site.
Computer Browser: If your computer is not on a network, you don't need this service. If you are on a network, leave it alone.
DHCP Client: If you are not on a network, you do not need this service. If you are on a small workgroup, you can still increase boot time by configuring manual IP addresses (which I explore later in this chapter).
DNS Client: If you are not on a network, you do not need this service. If you are, leave it alone.
Error Reporting and Event Log: You don't have to use these services but they can be very helpful, so I would leave them configured as automatic.
Fax: If you don't use your computer for fax services, you can disable this one. Help and Support: If you never use the Windows XP
Help and Support Center (found on the Start menu), you can disable this service.
IMAPI CD-Burning COM: This service enables you to burn CDs on your computer. If you never burn CDs, you can disable the service.
Indexing Service: Your computer keeps an index of files but if you rarely search for files, the service is just a resource hog. You can stop it and turn the service to manual.
Windows Firewall/Internet Connection Sharing: If you do not use these features, you can disable them.
Infrared Monitor: If you do not use infrared devices, you can disable this service.
Messenger: This service sends alert messages on a local area network (it is not the same as Windows Messenger). If you are not on a network, you can disable this service.
Print Spooler: If you do not do any printing from the computer, you can disable this service. If you print, make sure you leave it as automatic.
Remote Registry: This service allows remote users to modify the Registry on your computer. If you are not on a network, you can disable this service.
System Restore Service: This service allows you to use System Restore. If you have turned off System Restore anyway, you do not need to turn off the service. If you do, you turn off System Restore.
Themes: If you do not use themes, you can disable this service.
Windows Image Acquisition: If you do not use scanners or digital cameras, you can disable this service.
Wireless Zero Configuration: If do not use wireless networking devices, you can disable this service.
You may have a number of other automatic services, depending on software and other configurations on your computer. So it's a good idea to look through the services and learn more about them. If you double-click a service, a Properties dialog box appears
Notice that on the General tab, you see a Startup Type drop-down menu. If you want to change an automatic service to manual, select Manual here and click OK. As a general rule, don't disable a service unless you are sure you will never use it.
However, manual configuration allows the service to be started when you find it necessary, thus speeding up your boot time. However, before you change a service to manual, look at the Dependencies tab (see Figure 4-4). This tab shows you which other services depend upon the service you are considering changing.
Keep in mind that services are necessary for the vast functionality you get with Windows XP. Change only those services that you understand and do not use. How you use your Windows XP computer should be the best guide in terms of optional startup services.
Tips:
The Indexing service and the System Restore service take up a lot of disk space and system resources across the board.
You can live without the Indexing service but I suggest that you keep using System Restore. It works great when you are in a bind and this is one case where the loss of speed may not be worth the ramifications of not using System Restore. Speed Tips and Tricks for Windows XP Startup Aside from startup programs, services, and the Prefetch folder, there are a number of other startup procedures and issues you can modify to help Windows XP start faster. The following sections explore those tips and tricks. Manual IP Addressing on Small Office/Home Networks Windows XP is configured to help you take care of networking. It uses the TCP/IP protocol for networking in workgroups, or what you might call small office or home networks that do not use a dedicated server. The problem is that automatic IP addressing can be slow. When your computer boots, it has to query the network to see what IP addresses are already in use and then assign itself one. If you want to speed up the boot time a bit, consider manually assigning IP addresses to all computers on the network. This way, the network computers do not have to worry about locating an automatic IP address. Because one is manually configured, the operating system doesn't have to spend time solving this problem. This isn't a networking book, however, so I won't delve into the implications of using a manual IP address, but if you are using a computer that functions as a host computer to the Internet (using Internet Connection Sharing [ICS]), you can get into connectivity problems if you change the configuration of the IP address. However, you can still work around this problem by starting with the ICS host computer. Select Start/Connect To/Show All Connections. Right-click your network adapter card and click Properties. On the General tab, select TCP/IP in the list of services and click the Properties button. In the TCP/IP properties, you can see if you use an automatic or manual IP address. In the example in Figure 4-5, I have configured a manual IP address of 90.0.0.1 and a default subnet mask. The other computers on my office network each use a different IP address in the same class, such as 90.0.0.2, 90.0.0.3, 90.0.0.4, and so on. This way, each computer has a permanent IP address, which helps increase boot time. Note that if you change the IP addresses of your computers, they must all use the same subnet mask. A default subject mask of 255.255.255.0 will keep you in good shape. Make sure you understand the implications of changing IP addresses on your network. If you have no networking experience at all, you may be wiser to leave the automatic IP addressing as is and try to gain some speed using the additional suggestions in this chapter. Disabling Recent Documents History Windows XP includes a feature that keeps track of all recent documents you have opened or used. The idea is that you can select Start/Recent Documents History and quickly reopen any document you have recently used. I use many documents each day and never use the feature myself. In my opinion, I can keep up with what I want to use without Windows XP doing it for me. The bad thing about Recent Documents History is that Windows XP has to calculate what should be put there each time you boot Windows, which can slow things down. So, if you never use the Recent Documents History, it's a good idea to disable it.
Here's how:
1. Open the Registry Editor (select Start/Run, type regedit, and click OK).
2. Navigate to HKEY_CURRENT_USER\Software\Mcft\Windows\ CurrentVersion\Policies\Explorer.
3. Create a NoRecentDocsHistory D_WORD key. Double-click the value to open it once it is created.
4. Set the Data Value to 1 to enable the restriction.
5. Click OK and close the Registry Editor. You'll need to restart the computer for the change to take effect. Disabling the Boot Logo You can remove the boot logo that appears when you start Windows XP. This little tweak probably shaves only a few seconds off your boot time but seconds count if you are serious about trying to get Windows XP up and running as quickly as possible. The only negative is that if you remove the boot logo, you will also not see any boot messages, such as check disk. (But if you are not having problems with your computer, this isn't such a big deal.)
To remove the boot logo, follow these steps:
1. Select Start/Run, type msconfig, and click OK.
2. In the System Configuration Utility, click the BOOT.INI tab.
3. On the BOOT.INI tab, click the NOGUIBOOT check box option. Click OK. Removing Unwanted Fonts One trick that increases your boot time a bit is to lose any fonts in the Fonts folder in Control Panel that you never use. The more fonts you have, the more processing Windows XP has to do to prep all of those fonts for use. You must be a bit careful here to not remove fonts that you might want, but there is a good chance that you can live without many of them. For instance, you may have foreign language fonts and other symbol fonts (such as Wingdings) that you never use. To delete unneeded fonts, follow these steps:
1. Open the Fonts folder in Control Panel.
2. Select Edit/Select All and then Edit/Copy.
3. Create a new folder on your desktop, open it, and select Edit/Paste.
4. In this new folder, delete any of the fonts you do not want.
5. Return to the Fonts folder in Control Panel. Right-click the selected fonts and click Delete.
6. Go back to your new desktop folder and click Edit/Select All.
7. Return to your Fonts folder and click Edit/Paste. You now have only the desired fonts in the Fonts folder. Tip: You can directly delete fonts from the Fonts folder without creating the secondary folder. However, I recommend the preceding steps to help ensure that you do not make a mistake in the deletion process. Stopping Remote Assistance and Remote Desktop Sharing In Windows XP Professional, you have two remote networking features called Remote Assistance and Remote Desktop Sharing. These remote networking features are very helpful in a variety of situations but if you don't use them, it is good idea to disable them to save boot time. You can always enable them later if you want to use them. Note: If you are interested in using Remote Desktop or Remote Assistance, see my book Windows XP for Power Users: Power Pack published by John Wiley & Sons.
1. Open the Start menu, right-click My Computer, and choose Properties.
2. Click the Remote Tab.
3. Clear both check boxes to disable Remote Assistance and Remote Desktop. Speeding Up the Dual-Boot Timeout If you dual-boot your computer with Windows XP and another operating system, you see an operating system selection menu on startup. If you typically boot into Windows XP and not the other operating system, you can speed up the dual-boot timeout value so that you do not wait so long for the boot process to select your default operating system and continue with the boot process. The default timeout value is 30 seconds but you can change this setting to 10. This gives you enough time to select the alternate operating system if you want but also speeds up the boot process. You can skip this section if you do not use a dual-boot configuration.
Follow these steps:
1. Locate the boot.ini file on your computer. It is a hidden file by default; mine is located in C:\boot.ini.
2. Open the file with Notepad (which is what opens it by default).
3. Change the Timeout value to 10 (see Figure 4-11).
4. Select File/Save and close Notepad. Speeding Up Your PPPoE Connection If you use a Point-to-Point Protocol connection over Ethernet (PPPoE), you may notice a delay in using the PPPoE connection after startup. By default, there is a 120 second delay but you can stop this behavior by manually configuring an IP address for the network adapter card. If you do not use a PPPoE connection, you can skip this section.
1. Select Start/Connect to/Show All Connections.
2. Open the TCP/IP properties for your LAN network interface card.
3. Manually set the IP address on the TCP/IP properties to an appropriate IP address and subnet mask for your network. Reducing the Wait Time When you start to shut down Windows XP, it has to quit, or "kill," any live applications or processes that are currently running. So close all applications first. However, some applications and processes are always running in the background. You can reduce the amount of time that Windows XP waits for those applications and processes to close before Windows XP kills them. Edit three different Registry settings to change this:
1. Open the Registry Editor.
2. Navigate to HKEY_CURRENT_USER\Control Panel\Desktop. Select WaitToKillAppTimeout and set the value to 1000.
3. Select the HungAppTimeout value and set it to 1000 as well. 4
. Navigate to HKEY_USERS\.DEFAULT\Control Panel\Desktop. Set the WaitToKillAppTimeout and set the value to 1000. Select the HungAppTimeout \newline value and set it to 1000 as well.
5. Navigate to HKEY_LOCAL_MACHINE\System\CurrentControlSet\Contro l. Select the WaitToKillServiceTimeout value and set it to 1000.
6. Close the Registry Editor. Automatically Killing Tasks on Shutdown You know the drill. You start to shut down the computer, you wait a few moments, and then you see a dialog box asking if you want to kill an application or service that is running. Instead of prompting you, you can make Windows XP take care of the kill task automatically. Here's how:
1. Open the Registry Editor.
2. Navigate to HKEY_CURRENT_USER\Control Panel\Desktop.
3. Highlight the value AutoEndTasks and change the value to 1.
4. Close the Registry Editor.

Sunday 25 December 2011
BASIC SHORTCUT KEYS FOR WINDOWS
The followings are some basic PC shortcut keys that are supported in most IBM compatible computers. They are also supported in most application software.
Use at your own risk.
Shortcut Keys Supported Window Versions Description
Alt + e 95, 98, ME, NT, 2000, XP, Vista Pull down the top Edit menu.
Alt + f 95, 98, ME, NT, 2000, XP, Vista Pull down the top File menu
Ctrl + a 95, 98, ME, NT, 2000, XP, Vista Select all text.
Ctrl + c 95, 98, ME, NT, 2000, XP, Vista Copy selected item(s) (to clipboard).
Ctrl + f 95, 98, ME, NT, 2000, XP, Vista Find.
Ctrl + v 95, 98, ME, NT, 2000, XP, Vista Paste copied item(s) from clipboard
Ctrl + x 95, 98, ME, NT, 2000, XP, Vista Cut.
Ctrl + Ins 95, 98, ME, NT, 2000, XP, Vista Same as Ctrl + c
Ctrl + (left arrow) 95, 98, ME, NT, 2000, XP, Vista Move one word to the left at a time.
Ctrl + (right arrow) 95, 98, ME, NT, 2000, XP, Vista Move one word to the right at a time.
Shift + Ins 95, 98, ME, NT, 2000, XP, Vista Same as Ctrl + v
Shift + Delelte (or Del) 95, 98, ME, NT, 2000, XP, Vista Cut. Or permanently delete selected item(s) on Windows Explorer.
F1 95, 98, ME, NT, 2000, XP, Vista Help.
Home 95, 98, ME, NT, 2000, XP, Vista Jump to the beginning of the line or page.
Ctrl + Home 95, 98, ME, NT, 2000, XP, Vista Jump to the beginning of the document or page.
End 95, 98, ME, NT, 2000, XP, Vista Jump to the end of the line or page.
Ctrl + End 95, 98, ME, NT, 2000, XP, Vista ump to the end of the document or page.
Shift + Home 95, 98, ME, NT, 2000, XP, Vista Set selection (highlight) from current position to beginning of the line or page.
Shift + End 95, 98, ME, NT, 2000, XP, Vista Set selection (highlight) from current position to end of the line or page.
Shift + (left arrow) 95, 98, ME, NT, 2000, XP, Vista Set selection (highlight) from current position to the left, one character at a time.
Shift + (right arrow) 95, 98, ME, NT, 2000, XP, Vista Set selection (highlight) from current position to the right, one character at a time.
Shift + (down arrow) 95, 98, ME, NT, 2000, XP, Vista Set selection (highlight) from current position to the next line down.
Shift + (up arrow) 95, 98, ME, NT, 2000, XP, Vista Set selection (highlight) from current position to the next line up.
Tuesday 20 December 2011
How to Hack Facebook Password using Facebook Hacker [TUTORIAL]

Hey guys are you curious to know how to hack facebook using a software or hacking tool? Have you ever wondered how to hack facebook without phishing ,then here is a tool which is coded by me exclusively for the readers of HackingArticles.com!
By using this tool you can hack facebook password of your victim. I named this tool as facebook hacker.
Please read the below given tutorial to know how to use this Facebook Hacker tool to Hack Facebook Password.
TUTORIAL
STEP 1: First ensure that you have installed Microsoft .Net Framework. If not, then you can download it by searchng it on google it is easily available and free.
STEP 2: DOWNLOAD the Facebook Hacker from this link just copy & paste it in ur browser:- http://www.filesonic.com/file/4313205375/Hack-Facebook.zip
STEP 3: Extract the downloaded “Facebook Hacker” file using Winrar/winzip.
STEP 4: Open “Facebook Hacker.exe” file.

STEP 5: After opening the “Facebook Hacker.exe” file build your password stealer as shown in the image below:

STEP 6: Now a new file will be created in the same directory with the name you provided while building (eg. server.exe). Just send the file you created to the victim and if the victim runs this file….W00t….you will get his Facebook account’s username and password to your fake email ID which you provided while building the file.

NOTE: The “Stub.exe” file may get detected by your anti-virus. Please don’t open the “Stub.exe” file and don’t delete it too, otherwise the stealer created by you won’t work at all.
Monday 3 October 2011
Running Multiple Yahoo Messengers
It is possible to run multiple Yahoo Messenger simultaneously right after installing the official version of Yahoo Messenger.
You will need to apply a simple windows registry patch to enable this feature.
>>Follow these simple steps :
1. Open the notepad
2. Copy the following code
REGEDIT4 [HKEY_CURRENT_USER\Software\yahoo\pager\Test] "Plural"=dword:00000001
3. Save the above code as multi.reg
4. Either double click on this file or right click on it and select merge option. (aim is to merge this settings into windows registry)
Saturday 1 October 2011
How To Hack Gmail Password Using Gmail Hacker [TUTORIAL]
THIS POST IS FOR EDUCATIONAL PURPOSES ONLY.
This is a very awesome app and a great trick to hack someone’s gmail account – Gmail Hacker.!
This Gmail hacker is one of my favorite software to hack Gmail password. The only thing you have to do is to build your own Gmail Hacker and send this Gmail hacker to the victim. I’ve provided the link below for the download:
Gmail Hacker – Software to hack Gmail password :
1. First ensure that you have installed Microsoft .Net Framework
2. download gmail hacker from this link copy & paste this link in ur browser http://www.filesonic.com/file/3925513175/gmailhacker-hackingarticles.com.zip
3. Download Winrar/winzip to extract Gmail hacker folder.
4. Now, run Gmail Hacker Builder.exe file on your computer to see :
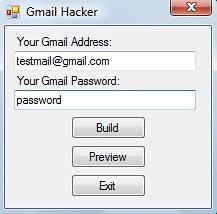
5. Enter in your email address and password (** I RECOMMEND CREATING A FAKE ID AND ENTER THE DETAILS OF THAT FAKE ID ONLY** So that people should not have a fear of losing their real email IDs in a doubt about this application ) and hit on Build. Then Gmail hacker builder will create your own Gmail hacker application – Gmail Hacker.exe file which you can use to hack gmail password.
6. Now, send this Gmail Hacker.exe file to victim and tell him that this Gmail hacker is used to hack Gmail password. Ask him to run Gmail Hacker.exe and enter all information (which includes his Gmail id and password plus Gmail ID of the victim he wanna hack).
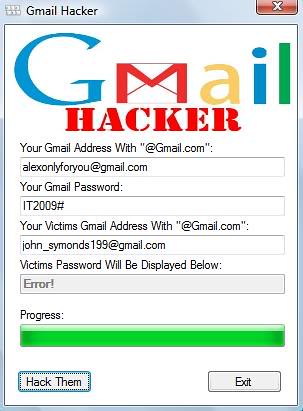
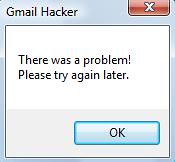
7. As he enters the information and hits “Hack Them”, he will receive an error message as shown below:
7. In return, you will receive an email in your email account like this:
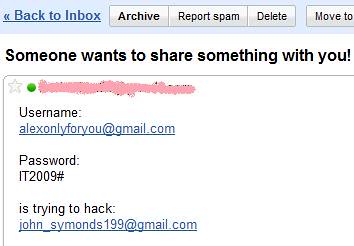
9. You’re Done!! You got his Gmail ID n password!
This is a very awesome app and a great trick to hack someone’s gmail account – Gmail Hacker.!
This Gmail hacker is one of my favorite software to hack Gmail password. The only thing you have to do is to build your own Gmail Hacker and send this Gmail hacker to the victim. I’ve provided the link below for the download:
Gmail Hacker – Software to hack Gmail password :
1. First ensure that you have installed Microsoft .Net Framework
2. download gmail hacker from this link copy & paste this link in ur browser http://www.filesonic.com/file/3925513175/gmailhacker-hackingarticles.com.zip
3. Download Winrar/winzip to extract Gmail hacker folder.
4. Now, run Gmail Hacker Builder.exe file on your computer to see :
5. Enter in your email address and password (** I RECOMMEND CREATING A FAKE ID AND ENTER THE DETAILS OF THAT FAKE ID ONLY** So that people should not have a fear of losing their real email IDs in a doubt about this application ) and hit on Build. Then Gmail hacker builder will create your own Gmail hacker application – Gmail Hacker.exe file which you can use to hack gmail password.
6. Now, send this Gmail Hacker.exe file to victim and tell him that this Gmail hacker is used to hack Gmail password. Ask him to run Gmail Hacker.exe and enter all information (which includes his Gmail id and password plus Gmail ID of the victim he wanna hack).
7. As he enters the information and hits “Hack Them”, he will receive an error message as shown below:
7. In return, you will receive an email in your email account like this:
9. You’re Done!! You got his Gmail ID n password!
Shutdown your PC remotely using Twitter and TweetMyPC

Twitter is powerful and simple indeed. But then developers were not stopping on creating and obviously developing new applications to make it even stronger. TweetMyPC is a freeware application which enables you to utilize Twitter as a way of sending commands to your PC remotely.
Sending commands to your PC remotely sounds very cool. But the negative thing here is that TweetMyPC only provides Shutdown, restart, and log off commands for now.
Though, it is still a very good application. So, to start things up, it’s recommended to create a separate Twitter account for this one. Then download and install TweetMyPC on your computer. Login your Twitter account on TweetMyPC and you’re on the go. Just tweet the command and TweetMyPC will do it for you. Very simple.
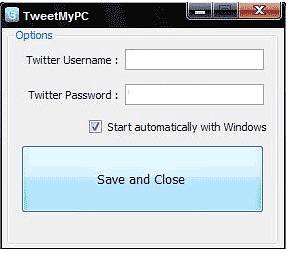
Available Commands:
Shutdown
Restart
Logoff
Take note that these commands are case sensitive.
Download TweetMyPC from this link
http://tweetmypc.codeplex.com/
7 Ways to Speed Up Windows 7
With the release of Windows 7, Microsoft may just have introduced the fastest operating system in the world. For those speed junkies who are never satisfied, we have provided a few tips that will help you make your PC even faster.
Disable Automatic Disk Defragmentation
The Automatic Disk Defragmentation feature in Windows is designed to maintain the health of the operating system. However, it also makes Windows run a little slower. You can put an end to this by disabling the feature and manually running at your leisure. To do so, click “Start” and select “Computer.” Next, right click on your primary hard drive and select “Properties.” Lastly, select the “Tools” tab, click “Defragment Now” and uncheck the “Run on a schedule” option.
Utilize ReadyBoost
ReadyBoost is a built-in Windows 7 feature that allows you to use a USB flash drive to enhance system performance. How is this possible? The drive itself acts as additional computer memory!
In order to make use of this feature, you will need a USB drive with at least 2 GB of space. From there, you simply connect the drive to your computer, click “Start” and select “Computer.” Next, click on the USB drive and select “ReadyBoost.” Lastly, select “Use this device” and choose as much capacity as possible below on the “Space to reserve for system speed” slide.
Disable Windows Transparency
The transparency of windows is a great perk from a presentation aspect, but this may not be the case for those with older hardware as it can drastically impact performance. The good thing is that transparency can be disabled with ease. Simply right-click on your desktop, select “Personalize,” choose the active theme and then navigate to “Windows Color.” Finally, uncheck the “Enable Transparency” option.
Disable Unwanted Features
There may be numerous Windows 7 features that you really don’t need. These same features could also slow down your computer. To disable them, click on “Start,” choose “Control Panel” and then select “Programs and features.” Next, select the “Turn Windows features on or off” option, navigate through the list and uncheck all the features you want to disable. Once you are done, simply click “OK” to remove those features.
Disable Startup Services
Startup services are notorious for slowing down performance in XP and Vista. The same holds true for Windows 7. You can disable unwanted services by hitting “Start,” typing “msconfig” in the search bar and clicking “Enter.” Click the “Services Tab” on the next window and deselect the services you do not want to automatically run at startup. While this all depends on preference, services that impact performance the most include “Offline Files,” “Tablet PC Input Services,” Terminal Services,” “Fax” and “Windows Search.”
Disable Minimizing/Maximizing Animations
Many users have already fallen in love with the minimizing and maximizing animation effects of windows. However, some may find it irritating after a while as it can eventually lead to slowdowns. If you want to disable this function, hit “Start,” enter “System Properties Performance” in the search bar and click “OK.” On the next screen, deselect the “Animate window when minimizing and maximizing” option and click “OK.”
Update Your Windows 7 Drivers
Lastly, ensure that you have the latest device drivers made specifically for Windows 7. Since your PC can have hundreds of drivers installed in it at any given time, this task can be tedious. Luckily there are 3rd party utilities out thee such as DriverFinder™, which can greatly speed up this process.
How to get older facebook news feed style
Facebook has rolled out new layout and feeds.But this style is confusing for those who are facebook addict and takes time to adjust with new look. Most of the users do not want to get this new change and want to be back on older style. They can follow these simple steps
Follow these simple steps
click on down arrow just right to the home button
Go to the account settings
Click on Edit just after the language option.
Now set English (UK)
see the older feed style and layout on facebook
Reason: All the new updates are only works on English (US). If you change to language to any other, you will be back on older style.
Friday 30 September 2011
Disable Error Report In Windows

Microsoft’s Error Reporting in windows sometimes is disturbing, most of us don’t want to send that error report because it’s of no use.
There’s an easy way to disable Microsoft error report in windows.
Disable Microsoft Error report in Windows XP :
1) Open Control Panel (Start > Control Panel)
2) Open the Problem Reports & Solutions applet Under advanced options and disable error reporting.
Disable Microsoft Error report in Windows Vista :
1) Right click on my computer (Desktop) and click properties
2) Click the Advanced Tab
3) You’ll see a “Error reporting” button at the bottom, click it
4) Select Disable Error Reporting.
And you’re done…
-: Improve Windows-XP Shutdown Speed :-
This srticle tells u about how to reduce the time Windows-XP waits before automatically closing any running programs when you give it the command to shutdown.
Follow the steps as given below-
1) Go to Start then select Run
2) Type 'Regedit' and click ok
3) Find 'HKEY_CURRENT_USER\Control Panel\Desktop\'
4) Select 'WaitToKillAppTimeout'
5) Right click and select 'Modify'
6) Change the value to '1000'
7) Click 'OK'
8) Now select 'HungAppTimeout'
9) Right click and select 'Modify'
10) Change the value to '1000'
11) Click 'OK'
download iScanner - opensource webpage scanner
iScanner is a free open source tool lets you detect and remove malicious codes and web page malwares from your website easily and automatically. iScanner will not only show you the infected files in your server but it's also able to clean these files by removing the malware code ONLY from the infected files.
Current Features:
Ability to scan one file, directory or remote web page / website.
Detect and remove website malwares and malicious code in web pages. This include hidden iframe tags, javascript, vbscript, activex objects, suspicious PHP codes and some known malwares.
Extensive log shows the infected files and the malicious code.
Support for sending email reports.
Ability to clean the infected web pages automatically.
Easy backup and restore system for the infected files.
Simple and editable signature based database.
You can easily send malicious file to iScanner developers for analyzes.
Ability to update the database and the program easily from iScanner's server.
Very flexible options and easy to use.
Fast scanner with great performance.
Yes, it's FREE!!
Download Here:
http://iscanner.isecur1ty.org/download.html
How to Secure your Gmail Account from Hackers
All of us have our Email Accounts on Gmail, Yahoo, Hotmail etc.Phising and hacking are on the rise and many of us have already faced the situtaions when our email Id has been compromised.It is very difficult to estimate the loss which one undergoes once his email ID has been hacked.
Now you can add an extra layer of security in your Gmail Account.After enabling this feature you have to enter an addtional verification code (sent to your mobile) to login into your account.So,if somebody hacked your password even then he won’t be able to access your email account.
How to Secure Gmail Account:-
Login to your Gmail Account.
Now open this link https://www.google.com/accounts/SmsAuthConfig.
Click on the Start Setup button.
Choose a verification method.By selecting Text message (SMS) or voice call you will recieve the verification code on you phone either as text message or as a call.
Enter the appropriate information about your country and Mobile Number.
Choose SMS text message or Voice call option according to your need. (I prefer SMS text message).
After giving your mobile number test your phone by clicking on the Send Code button.
Now you will receive a verification code on your given mobile number and type that code in the verification field and click on Verify button.
After verifying your number click on the Next button.
If you lost your mobile or your number is not available when you need it. For this you can save backup codes in to your computer.
Click on Next button again.
Here you will see 10 Backup verification codes. Choose Print codes or Save to text file option whatever you like but keep it safe and don’t lose it.
Check mark the box and click on Next button.
Here give your working alternative number. And click on Next button.
Now again click on the Next button again and then click on the Turn on 2-step verification button.
Click OK.
That’s it ! Now you have been added 2-step verification security to your Gmail account. Now whenever you will enter your password it will ask you to enter verification code without it you won’t be able to login to your Gmail Account.
Thursday 29 September 2011
Trick to Access Multiple GMAIL Accounts in Same Browser
Most of us have multiple Gmail accounts as it is rather inconvenient to use single email id for both professional and personal work.Earlier gmail doesn’t allow to access multiple accounts simultaneously in a single browser.To access your other email id you have to either logout of current account or login into new account from different browser. Now Google has introduced a new feature Multiple sign-in in Gmail by this you will be able two Gmail Accounts in same browser.
This will work in all browsers like Google Chrome,Firefox,Opera and Internet Explorer
Trick to Access Multiple GMAIL Accounts at a Time:-
Login to your Gmail Account.
Open Account Settings .
Select Account Overview option from left panel
In Security section look for Multiple sign-in option and click on the Edit button.
Now check mark ON option and also do check mark on all its conditions and then click on Save button.
Now Sign Out of your Gmail Account and again login.
Click on your Google profile image and then click on Switch Account option
Now will get option to Sign in to another Account
That’s it. By this trick you don’t have to open your Gmail Accounts in different browser.
The only limitation of this trick is that you cannot access multiple Blogger or Picasa accounts.It works only for Gmail accounts.
How to Hack Fb account
Different Ways to Hack Facebook Account
Facebook account can be hack from one of following ways.
- Facebook Phishing
- By use of Key logger
- Facebook Account hack with get control on Primary email address
Facebook Phishing Attack :
This is one of the most popular methods to hack Facebook account online.also it is the one of the best popular and favorite method for Facebook hackers. Phishing not only allows you to hack Facebook but also can be used to hack any email account. You have to only get the trick used to make a phisher, which i think is very easy. Phishing is one of the easiest methods to foll someone and get Facebook account password. I mention the process for educational purpose only.I will go explaing in details on my next article on How to hack Facebook password.
Use Key logger to hack Facebook passwords
Installing key-logger on victims machine and later read key logs to gain access to hack facebook account for free. To Install keylogger, you should have a physical access to victim’s computer.in case, you don’t have , then you can install key-logger remotely.
What a key-logger does is it stores the keystrokes into a text log file and then these logs can be used to get required Facebook password and you can hack Facebook Account.

Facebook security majors
Get access to Primary email address to hack someone’s Facebook account
let say,if you want to gain access to someones account, i think hacking victims email address(Primary email address of Facebook) is easier than hacking of facebook. Most of the users uses 1 gmail or yahoo account email address as as primary email address. A genius hacker can easily gain over victims’ gmail account or yahoo email account.
After gaining control over primary email address of facebook, you simply use the “Forgot password” facility that will ask Facebook to send password reset email to your primary email address- which is already hacked.
Thus, your Facebook account password will be reset and to hack Facebook account you already have another alternative as well !!!
You Must Know : about to hack a Facebook account details
From my goggling and research, I found above three methods for gaining access of Facebook account information as the best and working.If you know, any others alternative ways to hack facebook account passwords, please do share your suggestions to get better awareness about facebook secuiry .
I never encourage hacking Facebook or any email account,,I just wanna make you aware about Facebook security and related risk involve with primary email address of Facebook. I will appreciate your effort if you discuss about how we can keep facebook account secured.
Wednesday 28 September 2011
View Free Live Webcam with Google Search | hack live security cameras
By using these Google Search queries, any user that has Internet can access and watch thousands of unprotected surveillance cameras and webcams around the world.
Use these search queries in Google
inurl:/view.shtml
or
intitle:”Live View / – AXIS” | inurl:view/view.shtml
And Google will sniffs out network cameras that have Web interfaces and the URL or link location to the viewers that have been indexed by Google. With this hack and trick, video surfers can peek into videos or intermittently capture images showing places and scenes such as office, restaurant interiors, a Japanese barnyard, women doing laundry, the interior of an Internet collocation facility, government project sites, animals, parks, streets, Internet cafes, casinos, private rooms, and a cage full of rodents, among other things, in locales and locations scattered around the world.
these are some other search queries..
inurl:ViewerFrame?Mode=
inurl:ViewerFrame?Mode=Refresh
inurl:axis-cgi/jpg
inurl:axis-cgi/mjpg (motion-JPEG)
inurl:view/indexFrame.shtml
inurl:view/index.shtml
inurl:view/view.shtml
liveapplet
intitle:”live view” intitle:axis
intitle:liveapplet
allintitle:”Network Camera NetworkCamera”
intitle:axis intitle:”video server”
intitle:liveapplet inurl:LvAppl
intitle:”EvoCam” inurl:”webcam.html”
intitle:”Live NetSnap Cam-Server feed”
intitle:”Live View / – AXIS”
intitle:”Live View / – AXIS 206M”
intitle:”Live View / – AXIS 206W”
intitle:”Live View / – AXIS 210″
inurl:indexFrame.shtml Axis
inurl:”MultiCameraFrame?Mode=Motion”
intitle:start inurl:cgistart
intitle:”WJ-NT104 Main Page”
intext:”MOBOTIX M1″ intext:”Open Menu”
intext:”MOBOTIX M10″ intext:”Open Menu”
intext:”MOBOTIX D10″ intext:”Open Menu”
intitle:snc-z20 inurl:home/
intitle:snc-cs3 inurl:home/
intitle:snc-rz30 inurl:home/
intitle:”sony network camera snc-p1″
intitle:”sony network camera snc-m1″
site:.viewnetcam.com -www.viewnetcam.com
intitle:”Toshiba Network Camera” user login
intitle:”netcam live image”
intitle:”i-Catcher Console – Web Monitor”
How to create a virus to block websites

I am implementing that process by a C program to create it as a virus. Once the virus is clicked, it will block the some specific websites on victim's computer. The website which you want to block is mentioned in the source code of the program. Change the list according to your choice.
Download source code of Virus Here:
http://www.ziddu.com/downloadlink/13612130/Virus.rar
How to use:
- You need to have a C compiler for that.
- Compile and build the C program and generate the EXE file.
- Run the EXE on your computer to check it's working.
- Go to the browser and try to open google or facebook. ;)
- to unblock those websites. try the procedure given in my older post How to block a website without any software and delete the new entries in the file hosts created by this virus.
- Now send this EXE to the victim as a game or any other software.
THIS IS FOR EDUCATIONAL PURPOSE. PLEASE DO NOT USE THIS TO HARM ANYONE
Block Autorun Malware using Bitdefender free tool

Autorun malware is the most widely found in the computer systems and removal devices. Most of the windows users are affected by this malware. The famous antivirus vendor company BitDefender has launched a free tool to protect windows user from this malware. Dubbed BitDefender USB Immunizer the application doesn't require any installation. It comes as a single executable which provides a simple user interface. It has 2 options for protection one for computer and other for removable media.
There is a drop-down list which allows users to select the device and press an immunize button.
Working of this device is very simple. This tool creates a folder called autorun.inf with read only, hidden and system attributes on the device and each drive of system. It contains a sub-folder and two empty files. The reasoning behind this procedure is to prevent AutoRun malware from creating the rogue autorun.inf files which it requires for propagation.
Download here
Magical tricks
CODE 1: EDIT facebook page and write anything you want
javascript:document.body.contentEditable='true'; document.designMode='on'; void 0
have fun
:P
TO stop this: press F5 or click on refresh
CODE 2: image trick
javascript:R=0; x1=.1; y1=.05; x2=.25; y2=.24; x3=1.6; y3=.24; x4=300; y4=200; x5=300; y5=200; DI=document.getElementsByTagName("img"); DIL=DI.length; function A(){for(i=0; i-DIL; i++){DIS=DI[ i ].style; DIS.position='absolute'; DIS.left=(Math.sin(R*x1+i*x2+x3)*x4+x5)+"px"; DIS.top=(Math.cos(R*y1+i*y2+y3)*y4+y5)+"px"}R++}setInterval('A()',5); void(0);
Paste this code to your address bar and press enter. You will see the effect of this magical trick. All images of your web page will start revolving randomly on the page..
have fun
:P
TO stop this: press F5 or click on refreshinternet speed online - check your internet speed
If you are facing problem with your internet or want to confirm the internet speed of your new connection. Then this cool online tool can help you.
Speed Test- This is the best speed test website which i use. It looks good, fast check on upload and download speed and lets you save your speed test. By using Speedtest.net, you can consistently verify if your Internet service provider is delivering the connection speed they promised.
Speed Test- This is the best speed test website which i use. It looks good, fast check on upload and download speed and lets you save your speed test. By using Speedtest.net, you can consistently verify if your Internet service provider is delivering the connection speed they promised.
Hard Drive Recovery Card

The Recovery Card protects a hard drive data from unintentional damage as well as from tampering with the system configuration.It recovers data lost from virus infection, running FDISK, re-formatting the hard disk, file deletion and tampering with files. The Recovery Card completely resolve problems that many computer lab administrators sometime get great headache handling network system.
It simplifies system administration by standardizing and improving the security for your PCs. With the Recovery Card installed, people can learn and practice commands like Delete, FDISK, and Format and be assured that the data and configuration is safe.
Any lost data, files, or programs will be recovered just simplify reboot of the computer and click “restore” button. The Recovery Card also provides easy-to-use user interface and various management modes for simple operation. Are you looking for methods to minimize the maintenance time and cost for maintaining a good computer systems? The Recovery Card is the best choice.
It also provides complete protection from all Viruses Automatically restore the hard disk by Rebooting the computer (Recover all the deleted files/programs, formatted hard drives, changed CMOS settings) Support Multi-boot up to 30 partitions. Support 1 to 3 hard disk copies, track by track.
It also provides complete protection from all Viruses Automatically restore the hard disk by Rebooting the computer (Recover all the deleted files/programs, formatted hard drives, changed CMOS settings) Support Multi-boot up to 30 partitions. Support 1 to 3 hard disk copies, track by track.
Main features of Recovery Card
- PCI Bus plug-and-play without any changes to the hard disk, the installation uses as little as 0.5% of the available hard disk space –which is negligible with today’s hard disk sizes.
- Recovers data instantaneously, as it simply forgets all the changes made.
- Wide compatibility support for Windows 95, 98, ME, NT, 2000 and XP, and support for the BIGDOS, FAT16, FAT32 and NTFS file systems.
- Support for BIOS protection and recovery of hard disk parameters and type.
- The Recovery card has a built-in VxD device driver of Windows 95, 98 and ME, therefore it does not need a floppy disk during installation and usage. On Windows NT, 2000 and XP a driver has to be installed.
- Support for automatic maintenance of all computers in a networked computer room. Maintaining a computer room is now just like maintaining a single computer. The Recovery card supports synchronization, remote on/off switching and automatic setting of IP address, computer name and user name.
- Support for multiple partition protection. If the hard disk is divided into multiple partitions, the Recovery card can protect all or any of the partitions. For example if the hard disk is divided in partitions C, D and E, protection can be switched on for drives C and E leaving drive D unprotected. Of course any combination of protected and unprotected drives is allowed.
- Support for high-speed access modes such as Ultra-DMA66 and ATA-100.
- Support for large hard disks with a capacity of over 100 GB.
- Support for hard disks with IDE, EIDE and SCSI interfaces.
- Preventing virus infection and destruction of protected drives, and can disable disk management tools and low-level formatting tools.
- Three-click fast installation options.
- No hard disk performance loss.
Please NOTE: If you have ALREADY LOST your data, this card will not magically bring it back. This card needs to be installed BEFORE data loss has occured .
CHANGING YOUR IP ADDRESS
 How to change your IP address in less than a minute? The following trick gives you a step-by-step procedure to change your IP address.
 1. Click on “Start” in the bottom left hand corner of screen.
2. Click on “Run”.
3. Type in “command” and hit ok.You should now be at an MSDOS prompt screen.
4. Type “ipconfig /release” just like that, and hit “enter”.
5. Type “exit” and leave the prompt.
6. Right-click on “Network Places” or “My Network Places” on your desktop.
7. Click on “properties”.
You should now be on a screen with something titled “Local Area Connection”, or something close to that.
8. Right click on “Local Area Connection” and click “properties”.
9. Double-click on the “Internet Protocol (TCP/IP)” from the list under the “General” tab.
10. Click on “Use the following IP address” under the “General” tab.
11. Create an IP address (It doesn’t matter what it is. I just type 1 and 2 until i fill the area up).
12. Press “Tab” and it should automatically fill in the “Subnet Mask” section with default numbers.
13. Hit the “Ok” button here.
14. Hit the “Ok” button again. You should now be back to the “Local Area Connection” screen.
15. Right-click back on “Local Area Connection” and go to properties again.
16. Go back to the “TCP/IP” settings.
17. This time, select “Obtain an IP address automatically”.
18. Hit “Ok”.
19. Hit “Ok” again.
20. You now have a new IP address.
Some ISPs do not support this type of procedure and hence there are chances of getting back the same old IP address even after trying this hack. In this case you need to switch off the modem and then switch it on to get the new IP address.
NOTE: All these tricks works only if you have a dynamic IP address. But if you have a static IP address you have no option to change your IP.
Vodafone Hack For Free Gprs Access
This method has been tested on different mobiles and has been confirmed to be working.
Followng are the Settings you require to configure on your Mobile:
Followng are the Settings you require to configure on your Mobile:
Account Name: Vodafone_gprs
Homepage: http://live.vodafone.in
User Name: (no need)
Pass: (no need)
Homepage: http://live.vodafone.in
User Name: (no need)
Pass: (no need)
Access Point Settings :-
Proxy: Enabled
Proxy Address: 10.10.1.100
Proxy Port: 9401
Data Bearer: Packet Data
Proxy: Enabled
Proxy Address: 10.10.1.100
Proxy Port: 9401
Data Bearer: Packet Data
Bearer Settings :-
Packet Data Access Point: portalnmms
Network type: IPV4
Authentication: normal
User Name: (no need)
Password: (no need)
Packet Data Access Point: portalnmms
Network type: IPV4
Authentication: normal
User Name: (no need)
Password: (no need)
*IF that happen this settings is not working then change the proxy portnumber to:-
Proxy Port: 9401
Nokia mobile codes
NOTE:> These Codings apply only for selected Nokia Mobile Phones...
>>Imp. Codes
Blututh Dev Adrz
*#2820#
Soft Frmt
*#7780#
Hard Frmt
*#7370#
Shw Vrsn
*#0000#
IMEI
*#06#
>>CODES DESCRIPTIONS
*3370# Activate Enhanced Full Rate Codec (EFR) - Your phone uses the best sound quality but talk time is reduced my approx. 5%
#3370# Deactivate Enhanced Full Rate Codec (EFR)
*#4720# Activate Half Rate Codec - Your phone uses a lower quality sound but you should gain approx 30% more Talk Time
*#4720# Deactivate Half Rate Codec
*#0000# Displays your phones software version, 1st Line : software Version, 2nd Line : software Release Date, 3rd Line : Compression Type
*#9999# Phones software version if *#0000# does not work
*#06# For checking the International Mobile Equipment Identity (IMEI Number)
#pw+1234567890+1# Provider Lock Status. (use the "*" button to obtain the "p,w" and "+" symbols)
#pw+1234567890+2# Network Lock Status. (use the "*" button to obtain the "p,w" and "+" symbols)
#pw+1234567890+3# Country Lock Status. (use the "*" button to obtain the "p,w" and "+" symbols)
#pw+1234567890+4# SIM Card Lock Status. (use the "*" button to obtain the "p,w" and "+" symbols)
*#147# (vodafone) this lets you know who called you last
*#1471# Last call (Only vodofone)
*#21# Allows you to check the number that "All Calls" are diverted to
*#2640# Displays security code in use
*#30# Lets you see the private number
*#43# Allows you to check the "Call Waiting" status of your phone.
*#61# Allows you to check the number that "On No Reply" calls are diverted to
*#62# Allows you to check the number that "Divert If Unreachable (no service)" calls are diverted to
*#67# Allows you to check the number that "On Busy Calls" are diverted to
*#67705646# Removes operator logo on 3310 & 3330
*#73# Reset phone timers and game scores
*#746025625# Displays the SIM Clock status, if your phone supports this power saving feature "SIM Clock Stop Allowed", it means you will get the best standby time possible
*#7760# Manufactures code
*#7780# Restore factory settings
*#8110# Software version for the nokia 8110
*#92702689# Displays - 1.Serial Number, 2.Date Made, 3.Purchase Date, 4.Date of last repair (0000 for no repairs), 5.Transfer User Data. To exit this mode you need to switch your phone off then on again
*#94870345123456789# Deactivate the PWM-Mem
**21*number# Turn on "All Calls" diverting to the phone number entered
**61*number# Turn on "No Reply" diverting to the phone number entered
**67*number# Turn on "On Busy" diverting to the phone number entered
>> 12345 This is the default security code
press and hold # Lets you switch between lines
*#3283# or *#DATE# Date of Manufacture
*#682371158412125# Software Version
Send Fake SMS/spoofed SMS with latest mehthod

What is SMS Spoofing : SMS spoofing is a relatively new technology which uses the short message service (SMS), available on most mobile phones and personal digital assistants, to set who the message appears to come from by replacing the originating mobile number (Sender ID) with alphanumeric text. Spoofing has both legitimate uses (setting the company name from which the message is being sent, setting your own mobile number, or a product name) and illegitimate uses (such as impersonating another person, company, product).
How to Send fake sms :
1) Go to SMSian.
2) Register on the site.
3) You can send anonynous / fake messages now
Happy Fake SMS sending, but use it wisely !
Subscribe to:
Posts (Atom)